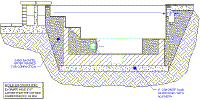
STANDARD NESPA IN-GROUND INSTALLATION
INSTRUCTIONS:
Please Note: Prior to actual installation,
the spa needs to get from delivery vehicle to its final
location.
SET-UP AND EXCAVATION:
1) In order to determined how to excavate for your spa or
swim spa, measure spas inside dimension ( I.D.) and add 8" to
all sides. This 8" clearance is to accommodate jet and suction
plumbing. This 8"clearance can change or be reduced upon
request. Note: skimmer location, this area may have to be larger
than 8". If you have questions call us. (888) 479-4677.
2) Hole depth is determined by spa's outside height
dimension. This height may vary depending if spa has skids or no
skids. Also consider the finish surrounding deck elevations,
thickness of the finish material on spa upper horizontal lip.
This material can be tile, stone, concrete or brick.
3) Pre-plumb spa before it goes into the hole (spa is factory
pre-plumbed, unless asked for otherwise).
4) Spa should sit on level 4" thick reinforced concrete pad.
5) Install spa into the hole on top of concrete pad. Do not
hold onto pipes. Use caution with suction and jet plumbing when
lowering into hole. DO NOT STRESS FITTINGS !
6) Check site reference points for proper spa positioning
(i.e., squaring to house, garage, etc.).
7) Shim to level spa. Shim with non-compressible material.
8) Dry pack with cement, gaps that have been created when
shimming spa level.
9) Connect pipes to tees if pre-plumbed. After electrical
conduit is connected to light niche, water test spa before back
filling with sand.
10) All Nespa products are water tested prior to leaving
factory.
ELECTRICAL:
1) All electrical connections to spa or equipment should
comply with the national electrical code. (NEC)
2) Connect electrical conduit to light niche. This work
should be done or reviewed by a licensed electrician.
3) To install spa light you will need to include inside the
PVC conduit to the light niche a solid #8 coated copper wire.
(If you are use brass conduit, internal bond wire is not
required.) This bond wire should be pulled with the light cord
at the same time. This bond wire needs to be attached to the
internal bonding lug of the light niche. An approved encapsulate
should be applied to bond wire connection in niche.
4) An external #8 copper wire shall be connected to the
external bonding lug on the rear of the light niche. This copper
wire can then be used for additional bonding requirements (i.e.,
handrails or any other metallic object within 5' of the spa.
PLUMBING:
1) When plumbing a Nespa it is important to properly size the
plumbing. We highly recommend that you follow the pump
manufacturer's pipe sizing requirements. Example is spas within
50' of equipment, a 2 ½" suction, a 2 ½" return would be used.
2) The air venturi should be hartford loop adjacent to spa
shell and air entry point can be located next to spa or remotely
at equipment.
3) Fill spa with water and test the system for leaks.
SAND BACK FILL:
1) With water in spa, back-fill around spa perimeter with dry
plaster sand and wet wash with hydraulic attachment to hose. Let
set for one hour and hydraulic dry again. Be sure water level in
spa is at the highest level. Any questions please call us. (
888) 479-4677.
|